Why a Coastal Sketch Needs More Than a Level Horizon
Coastal sketching is easier to read when the horizon, shoreline and foreground work together. Learn how to place each shape without flattening the view.
The common coastal sketching mistake is to draw a level horizon and treat it as the whole sea. That can leave a tidy but flat strip of water, with no clear relationship between the shore, nearby rocks and distant land. Keep the horizon level when that is what you see, then build the scene around it.
A broad view of open water usually gives you a steady horizon. The character of the view comes from the boundaries that interrupt or lead towards it: a headland cutting across the distance, a beach turning away, or a near rock covering part of the water. Think of the page as a map of what sits in front of what, rather than a row of horizontal bands.
Where should you sit to see the shoreline?
Choose a spot with a clear near-to-far sequence: perhaps a rock or a curve of wet sand nearby, open water beyond, and a headland in the distance. A sheltered bench, firm sand above the active wash or a safe place on a low headland may give you a steady view.
Before settling, check the path, tide and ground around you. If the place is slippery, unstable or likely to be reached by waves, move to a safer position. Keep your sketchbook and pencils out of the way of other people using the shore.
Turn the sketchbook upright or sideways and compare the edges of the scene against its page. Rather than choosing the widest view, look for a useful point where one shape meets or covers another. A slight shift to the left or right can reveal a gap between headlands or make a foreground rock overlap the distant coast.
Pick the position that makes the relationships easiest to see.
How can you organise the view as a set of anchors?
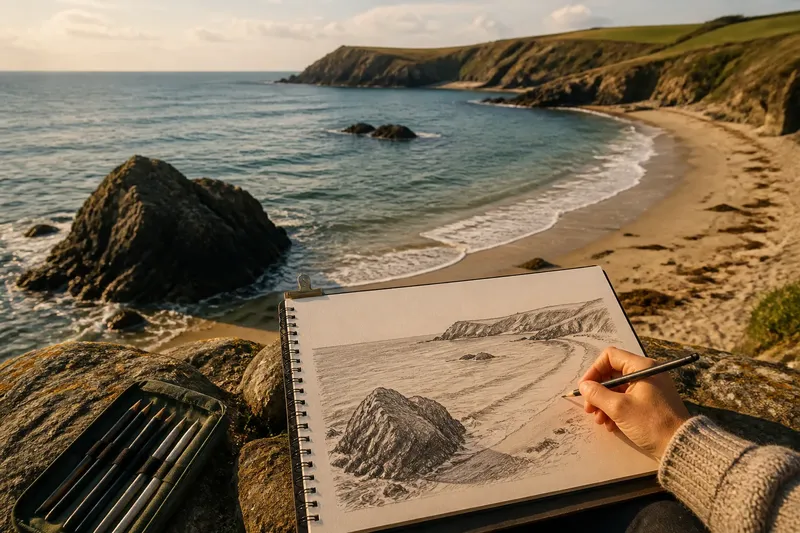
Use three visual anchors to make the scene distinctive: a near shape, a crossing edge and a distant stop. The near shape might be a boulder or a wedge of sand; the crossing edge might be the curving waterline; the distant stop might be a headland that closes one side of the view. These anchors give the sketch a local structure instead of relying on generic bands of sea and sky.
Make a small thumbnail with three simple shapes before drawing into the main page. Give each anchor a different job: one starts the eye, one guides it, and one holds it in the distance. If two shapes merge, shift your framing or leave a narrow strip of paper between them so the relationship remains legible.
For instance, imagine you are looking into a cove where a dark boulder sits near the lower left, a curved strip of sand leads towards a low headland, and open water fills the gap. In a thumbnail, place the boulder first, draw the sand edge as a single sweeping line, then add the headland as the distant stop. The expected result is a view that leads from the near rock into the cove, rather than ending at a flat water strip.
How do you place the horizon in a coastal sketch?
Mark the horizon lightly where open sea appears to meet the sky. In a broad view, keep it level if that is how it looks from your position. Where an island or headland blocks it, draw the visible land silhouette and leave the hidden part out.
Choose the horizon’s height according to the amount of sky and foreground you want to show. Then place the shore as a separate, changing edge. A beach may turn towards a cove, narrow into the distance or disappear behind a rock; it does not need to run parallel to the horizon.
Begin with light marks using a graphite pencil, a mechanical pencil held gently or a water-soluble pencil. If you intend to use ink, plan the main shapes in pencil first. This gives you room to correct an overlap or adjust the spacing before committing to a dark line.
What should you check before adding detail?
- Check whether the horizon reads as level across open water; if it does, keep it steady, but if land interrupts it, draw the land silhouette instead of carrying the line through.
- Check whether a near object clearly covers part of the sea or shore; if it does, preserve that overlap, but if the shapes merge, leave a small gap or alter the contour.
- Check whether the beach edge points into the scene; if it does, keep its direction, but if it ends abruptly, simplify the curve or connect it to a visible inlet or rock.
- Check whether distant land has fewer sharp details than the foreground; if it does, retain the softer treatment, but if it looks equally bold, lighten or interrupt some distant outlines.
- Check whether each water mark explains a larger form; if it does, keep it, but if it is only a stray ripple, leave it out or soften it.
- Check whether the darkest marks compete across the page; if they do, reserve the strongest contrast for a few anchors, but if one focal area is unclear, add a restrained dark accent there.
Squint gently to group small marks into larger light and dark areas. A pale band between sand and distant land may matter more than several individual ripples. Look back at the actual scene as the light changes, and revise only the relationships that have become unclear.
How can you suggest distance without drawing every wave?
Distance is easier to read when edges and detail change across the page. A near rock may have a crisp contour and a distinct shadow, while a distant headland can be simpler and less sharply outlined. Keep that contrast selective; outlining every form with equal weight tends to flatten the view.
Water marks should describe a pattern, not inventory every ripple. A few broken strokes can suggest foam curling around a rock, while a softer change in tone may be enough for calm water. If a mark does not explain shape, direction or movement, it can stay off the page.
Let overlap do some of the work. A strip of beach can cover the base of a rock; the rock can cover a piece of water; a far line of surf can sit behind a darker near-water shape. Those small interruptions make the scene easier to read without extra detail.
What do sketchers ask about the horizon and shoreline?
Should the horizon always be perfectly straight?
Across a broad view of open sea, the horizon generally appears level, so draw what you observe rather than adding a curve for drama. If a headland or island blocks it, show the visible land edge and omit the hidden section.
How do I show a curved beach on a flat page?
Draw the visible edge as a directional shape, changing its width and detail as it recedes. Keep the near section clearer if that is what you see, and simplify the part that turns away.
Which water marks are worth drawing?
Keep marks that clarify a larger shape, such as foam wrapping around a rock or surf that shows the shore’s direction. Leave out small ripples that do not help establish form, distance or movement.
What if the sea looks almost featureless?
Use its boundaries to give it shape: the shore, distant land, a cloud shadow or the difference between near and far water. A quiet open area can help the other forms stand out.
Which tools are useful beside the water?
A small sketchbook with paper suited to your medium is easier to manage in a breeze than a loose sheet. A graphite pencil is useful for planning, while a darker pencil can add a few accents. Coloured pencils, compact watercolours or pens are optional; choose only what you can handle comfortably outdoors.
Use a clip or firm backing board to keep pages from lifting. A cloth can help keep sand off the paper, and a sealable pouch can protect pencils and erasers. If you paint, contain the water and take waste away; follow the materials’ labels and instructions.
Keep the kit simple enough that you can look up often. Compare the page with the scene before adding another mark, especially when the light or tide has shifted.
How do you finish without flattening the view?
Check three relationships: whether the open-water horizon sits where you intended, whether the foreground overlaps the distance, and whether the shoreline leads into the composition. If one is unclear, adjust that part instead of adding detail everywhere.
Save the strongest contrast for a few useful places, such as the underside of a near rock or a dark notch in the land. Keep distant forms lighter or less defined when the scene calls for it. Leave some edges open so the drawing does not turn into a set of enclosed shapes.
For a coastal sketch, the horizon is a reference, not a shortcut to the whole view. Before closing the book, note one feature that belongs to this particular place: perhaps a narrow gap between two headlands or a boulder interrupting the wash. That observation gives you a specific anchor to look for next time.